Disclaimer: Installing Samsung firmware using Odin is not the official way to do it. This method is used only if you want to unroot or re-install an official firmware in case you’re using a Custom ROM. Odin can also be used if you want to install another country’s firmware on your device. You should always be careful that the firmware you install is for your model precisely. We cannot be held responsible for any damage that your device might incur, so proceed at your own risk.

Is your Samsung phone shutting off unexpectedly, crashing apps, or acting buggy? If you want to fix these problems, it may be time for a Samsung firmware update.
Just like getting an oil change or tire rotation, updating the firmware on your phone can help it run smoothly and more efficiently.
The benefits of updating your firmware include access to…
- new features
- security patches
- updated hardware functionality
- more goodies than we have space for in a single article
Let’s take a look at how you can use Odin to update your Samsung firmware.
“Hold up, what the heck is Odin anyway?”
Odin is Samsung software that leaked onto the internet a few years back. It lets you install firmware and future updates right onto your Galaxy smartphone.
IMPORTANT NOTE! Odin is a very powerful tool and should be used very carefully. If Odin falls into the wrong hands or you aren’t careful, it can turn your phone into a very expensive paperweight. In techie terms it can “brick your phone,” essentially rendering it useless. Please make sure you’re careful when you use it.
However, Odin can also come in handy when you’ve accidentally messed up an installation because it will allow you to reverse your mistake.
Gettin’ It Done: What You’ll Need for a Samsung Firmware Update
To use this method, you’ll need two things:
- Odin –flashing software tool for Samsung Android smartphones
- Flashable firmware – the latest Samsung firmware update for your device
How to Do a Samsung Firmware Update Using Odin: 15 super-easy steps
- Download Odin 3.09
- Extract the content from Odin to your computer.
- Download the latest firmware for your device.
- IMPORTANT! Samsung Kies is not compatible with Odin. You have to make sure that Kies is not running in your system tray. It is recommended to uninstall Kies before using ODIN.
- Download and install the Samsung USB Drivers.
- With the device turned off, press ‘Power+Volume Down+Home’ to enter Download Mode. (If this key combination doesn’t work, just Google ‘Device Name+Download Mode’).
- Connect your phone to your PC with the USB cable.
- Right click on Odin 3.09 and click on ‘run as administrator’.
- Make sure you’re looking at something like this:
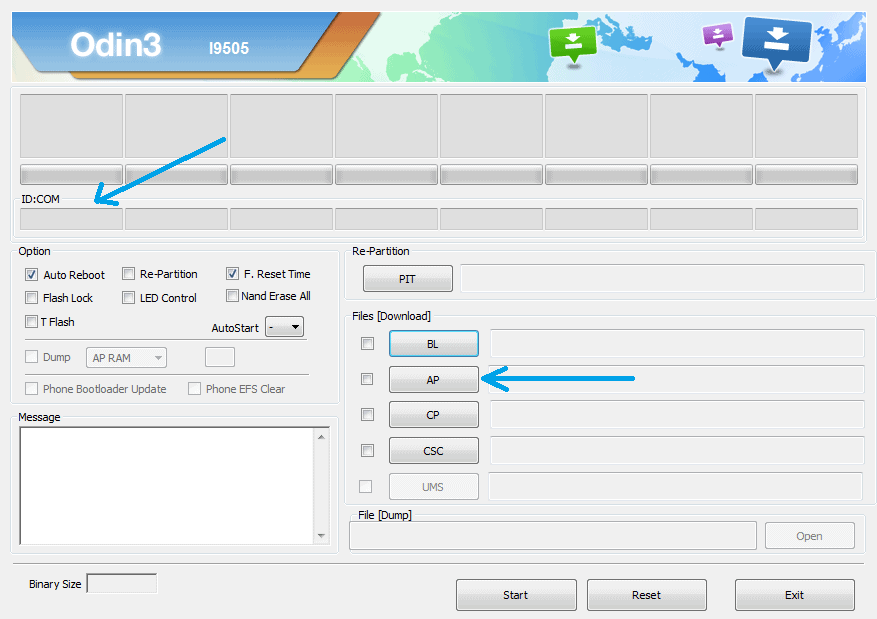
- There is a section called ID:COM (on the left upper side of the window). The blank space underneath it will turn blue if your device is recognized. (If the phone is not recognized make sure you have installed the USB Drivers).
- Click on ‘AP’ and add the .tar.md5 file from the firmware archive.
- IMPORTANT! Do not place anything under the PIT section and make sure that “re-partition” is NOT checked. (On the left side you will see re-partition under the Option tab).
- When the firmware file is loaded, you can press START to being the installation.
- Don’t touch the USB cable while the firmware is being flashed.
- At the end you will see a message saying ‘PASS” on a green background. This means that the installation is done. The device should reboot and run on the new firmware.
Again, be extra careful when you navigate the Samsung firmware update process using Odin. Read the directions carefully before touching your phone. It’s a good idea to print them out and follow them closely step-by-step. Make sure you understand all the risks associated with installing firmware on your Samsung phone using Odin.
If you’re having issues updating your firmware using Odin, or you’ve used another method that works even better, let us know in the comments below!
ConversionConversion EmoticonEmoticon